Cases can be found on the smg360 platform and are a way for clients to close the loop on issues their customers experience (CX). A case is created whenever a customer requests to be contacted regarding their experience in the CX survey. Depending on how your specific CX program is set up with SMG, you may also receive case notifications with case details, letting you know you need to take action on the case.
Please Note
Depending on your company's CX survey, Cases can be broken out into multiple types based on the reason the customer is asking to be contacted. Different cases may also be sent to different users or user groups.
This article serves as a guide covering the following case information:
About Managing Cases
Cases are important because by resolving cases, brands show that they care about their customer's experience. This can help them regain the confidence and trust of their customers who submitted the issue/complaint. Cases can be managed and resolved when you log in to the smg360 platform. As needed, the case also allows you to communicate with the customer back and forth until a proper resolution is reached.
What is the difference between Cases and Alerts?
Cases are created when a customer takes your CX survey and asks to be contacted.
Alerts are set up to alert you of important information gathered from the CX survey as defined by your company. With alerts, a customer does not need to be contacted since these are not created by a customer's request but instead by set parameters programmed into the survey.
The next section explains how to access cases on the smg360 platform.
Accessing Cases
 |
 |
- A case can be accessed by clicking on the case link in the email notification
OR
- Log in to smg360 to view Cases
- From your home page, you will see a "Case" link on the blue menu bar that, when clicked on, takes you to the Cases dashboard.
Note: Please note that the blue menu bar varies based on your company's CX program with SMG, so instead, it may say Case, Text Analytic + Case, Comments + Case, etc., but regardless of what it is named, it will take you to the Cases dashboard.
|
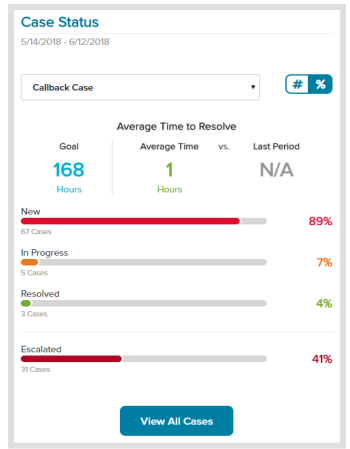
- Additionally, if you have a Case Status card on your home page or multisource dashboard, you can click on "View All Cases" from the card, and it will also take you to the Cases dashboard.
|
The next section details information about what you'll find on the Cases Dashboard.
Cases Dashboard
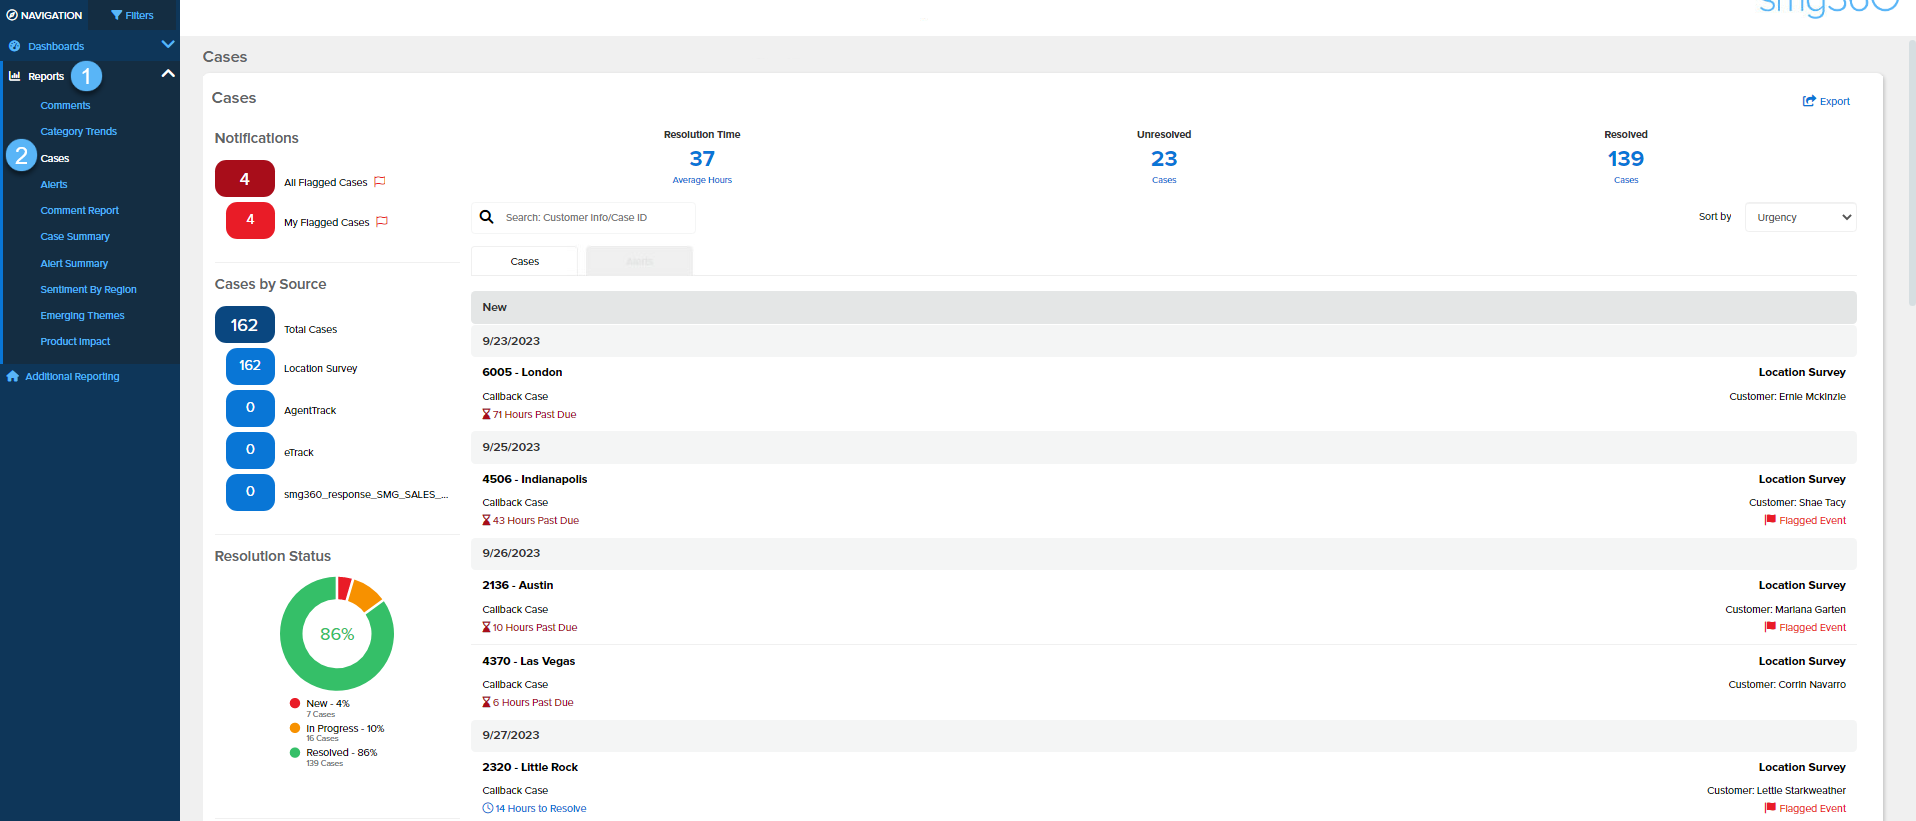
When landing on the Cases Dashboard you will see that it is located in the Reports section. Additionally, you will see all cases listed and a summary of case statuses. Cases are displayed in the list based on their urgency, date, and hierarchy filters.
Cases Dashboard Details
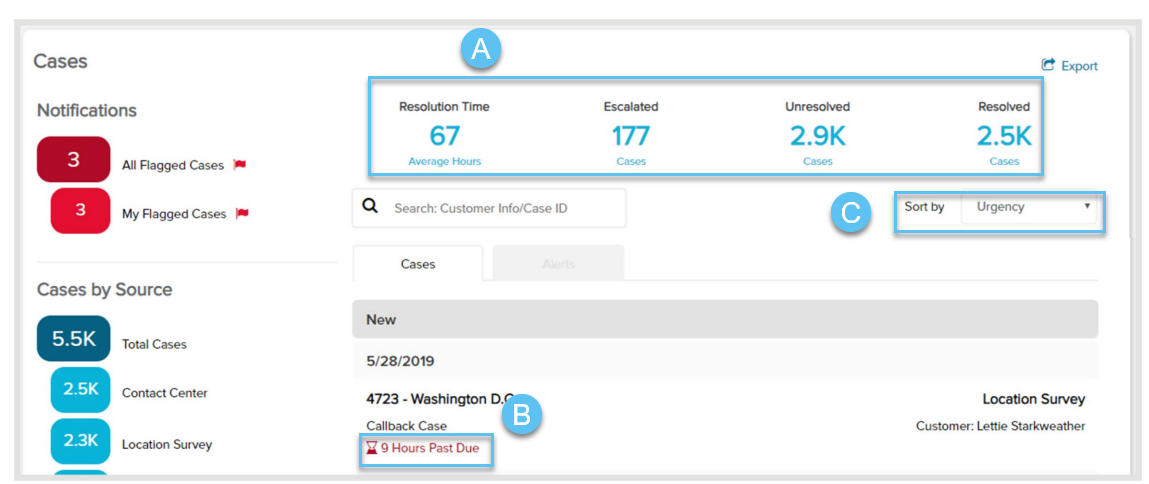
- At the top of the Cases Dashboard is an at-a-glance summary of case statuses. Here, you will see the average resolution time, if there are open cases that have been escalated, how many cases are still in an unresolved state, and how many cases have been taken care of and resolved.
- The listed cases will show a timer (also known as 'Time to Resolve') indicating how many hours are left to resolve the case before it is marked as past due. If past due, the timer then shows how many hours past due the case is when compared to the goal set to resolve cases as decided by your management team or the company.
- As a quick filter, you can use the Sort by option to list the cases by different criteria such as Urgency, Newest, Oldest, etc.
|
 |
|
If you need to find cases quickly, use either option below:
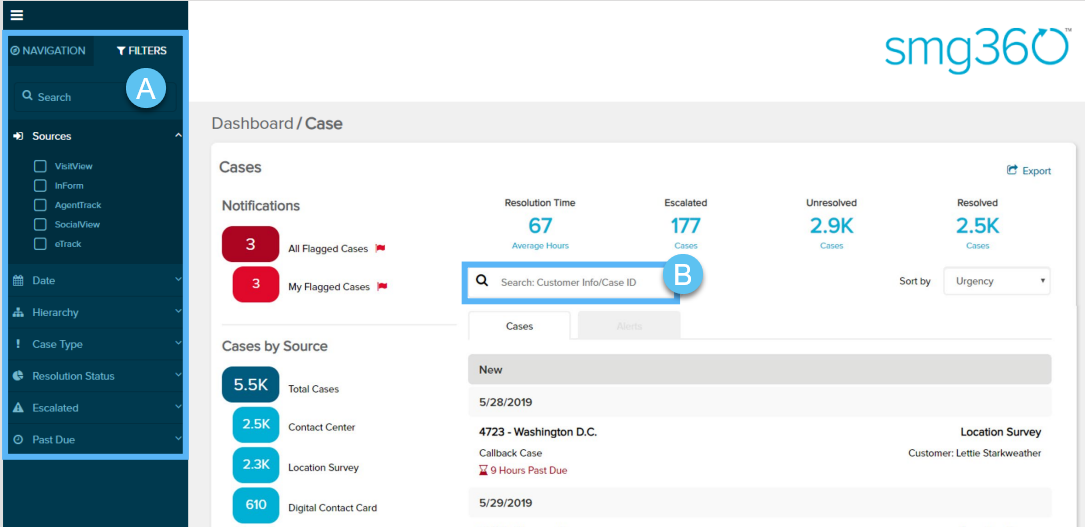
- Filter and narrow down your list of cases by Source, Status, Case Type, Escalated, etc.
OR
- Search for specific cases or specific customers using details like Case ID, customer name, email,
or phone number
|
 |
The next section provides information about Case Details when a case is clicked on, and actions you can take.
Case Details and Actions
Once you locate the case you want, click on the case to drill in and view the details; if you click on the case link from the email notification, you'll also reach this same case details view. From there, you will be able to action on the case to ensure it is resolved properly.
Case Details
 |
 |
|
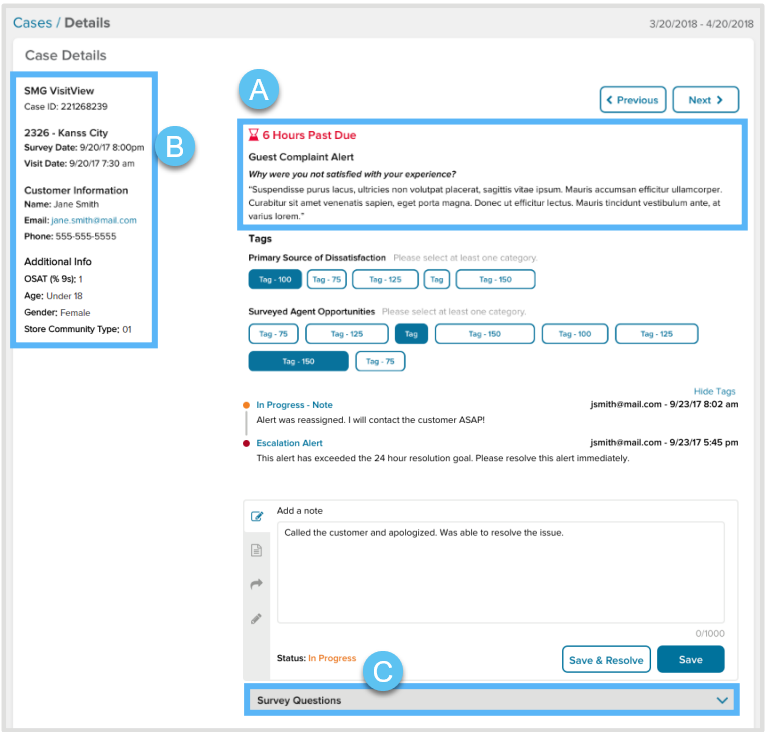
Case Details at a glance:
- At the top of the page, you will see the 'Time to Resolve' status and the customer's response to the open-ended question explaining the issue they encountered.
- You'll find the location, visit details, Customer Information, and any pertinent additional details on the left side of the page.
- As a best practice, always use the Case ID when referencing a specific case, as this is the most efficient way to identify and find cases since these are unique IDs that our system has assigned to the case.
- If enabled, locate survey questions at the bottom of the page for additional context of what led to this case being created.
|
If applicable to the case you clicked on, review actions that have already been taken on the case:
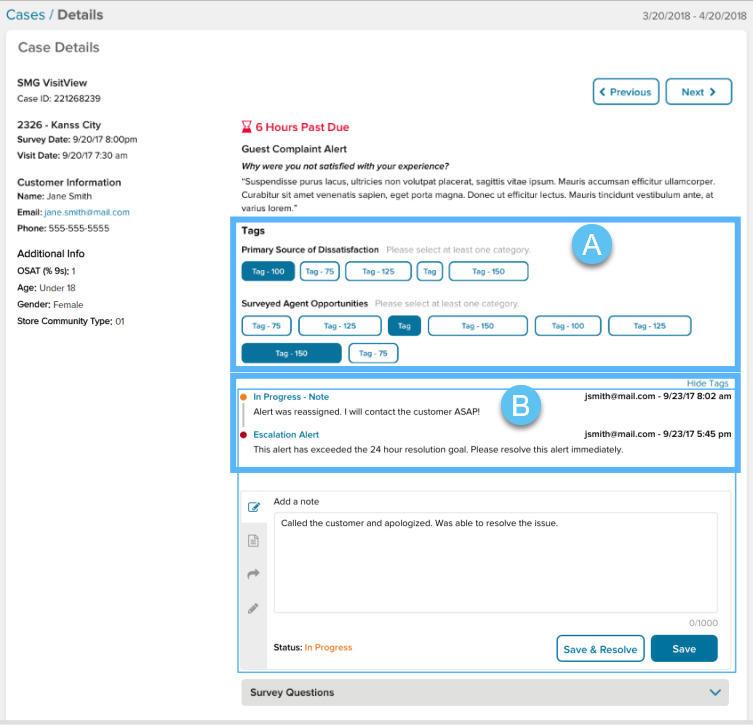
- Tags can be selected at any time, but some are required prior to resolving a case; tags can be updated even after the case is resolved. You can hide and show tags by clicking on the line or
arrow next to the section title.
- The Timeline section tells you all actions that have been taken and who took those actions; click on an event to expand and collapse, click on "Collapse Timeline" or "Expand Timeline" to expand and collapse every event, or click on the section header to hide the timeline.
|
Case Actions
 |
 |
|
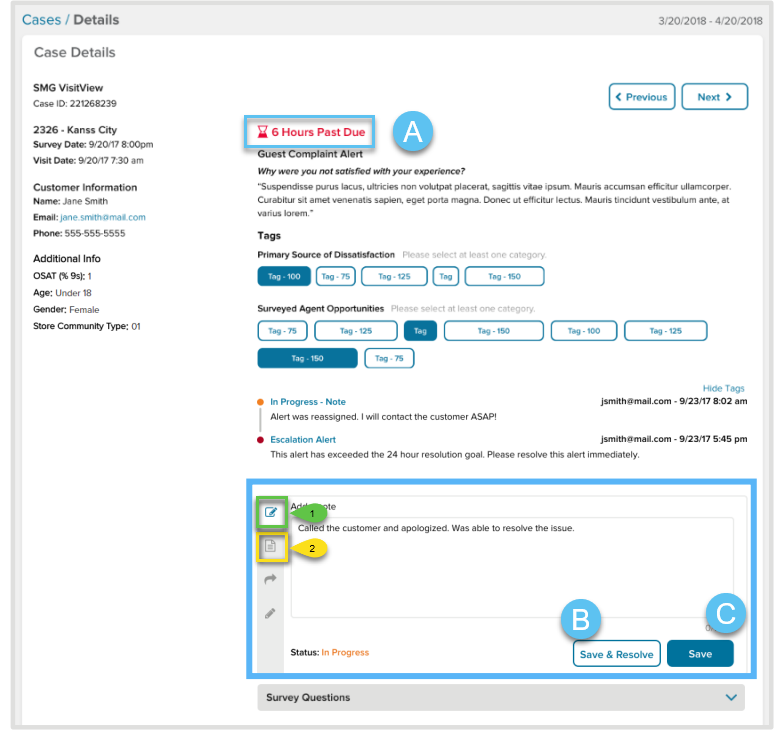
You can update and resolve a case:
- The time remaining to resolve at the top of the page will automatically update to reflect the time it took to resolve the case.
- Once you've closed the loop with the customer and are ready to resolve the case, simply add a note and click on "Save & Resolve."
- 1) You can add a note by typing at least 10 characters and hitting "Save." Note that adding a note to a new case automatically updates the status to "In Progress."
2) If enabled and uploaded, you can use scripted responses. Scripted responses are pre-populated response templates approved by your company or management team to respond to the customer. The benefits of Scripted responses are that they allow for a consistent brand tone and voice to be used across all brand locations when communicating with customers.
|
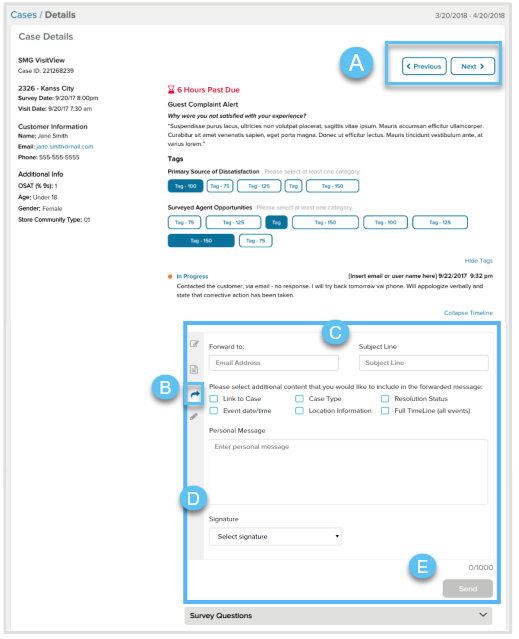
You can share a case with a fellow associate as an FYI, or if you need help answering a question:
- Navigate through your filtered cases by clicking the "Previous" and "Next" buttons, or click "Cases" at the top left to go back to the list view.
- Send information about a case to someone else from the Forward tab in the case actions section.
- Enter the desired email address(s), add a subject, select additional details to send or type a personal message, and select a preconfigured signature (or choose "Custom").
- You can add a signature to use on any emails from the signature tab (pencil icon) in the case actions section.
- Click Send. If you send a resolved case, it will move under the "Resolved" heading in the list.
|
The next section details how you can mass export cases.
Export Cases
Export your case list to review and report case data in whatever way you need.
|
First:
- If you want a date range or hierarchy level different from what is displayed by default, use the Date and Hierarchy filters on the left.
- Click on "Export" at the top of the page.
|
 |
|
Next:
- Select one or more reports, depending on the level of detail you need
- Enter your email address to email the report(s) to yourself; you will receive an email once the reports are ready to download
- Click Email Report
|
 |
The last section below details different case summary graphs and reports.
Cases Summary Graphs and Reports
Note
Data will always be displayed up to the latest completed period based on your program's period type.
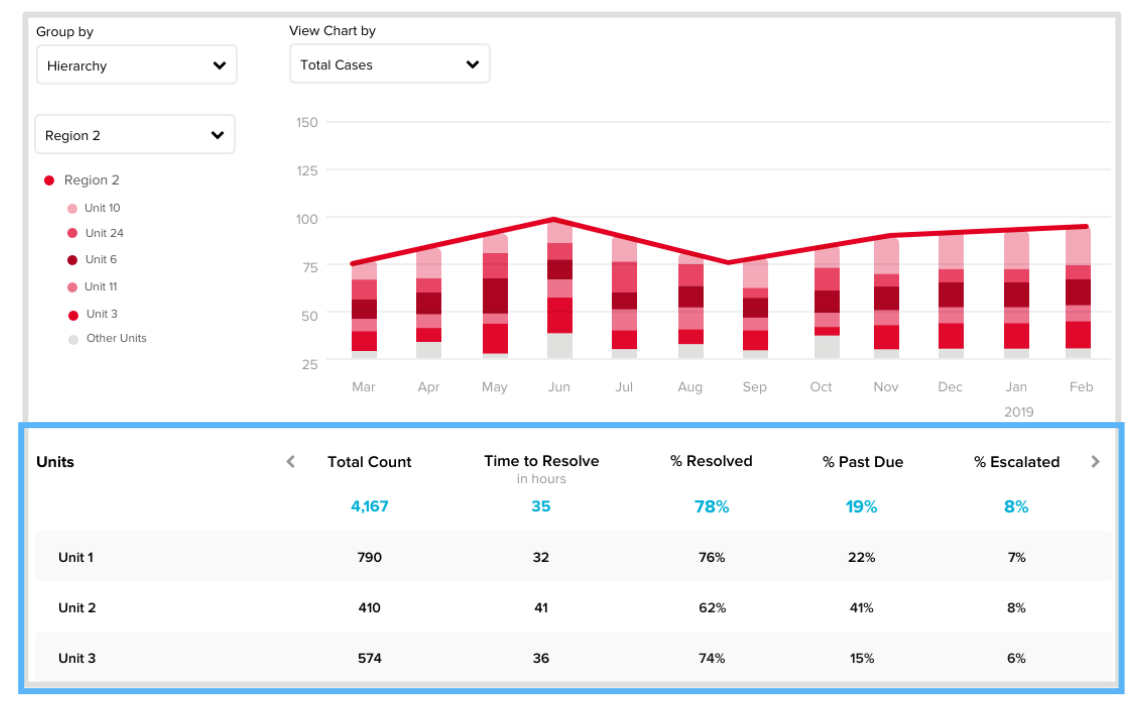
Case Trend Graphs
- See how cases are trending over time by source, hierarchy, or custom grouping
- Group your trend data by Hierarchy and choose whether you want to compare metrics across units or higher-level groupings; if you choose a higher level, you can click on the colored dot or bar that corresponds with an individual group on the trend to see the distribution of the level below it
- Group by Source to view metrics by source or case type
- If you have tags configured, group them by Categories to view the tag breakdown for each of
your categories for each case type
- You may also have the option to group by a custom measure
- Click on the "View Chart by" dropdown to change the metric you're trending
- You will see the top 5 groupings, based on total volume, by default; change any or all of these by clicking on the name of any of these groupings to find the one you want to see
|
 |
Case Data Table
- View case measures in the aggregate to compare by grouping
- All of your grouping and drill-in interactions with the trend graph will also update what you see in the data table below
- Click through the arrows at the top of the table to see additional columns or at the bottom of the table to see additional pages of data
- Any column header with double arrows next to it can be sorted ascending or descending
|
 |
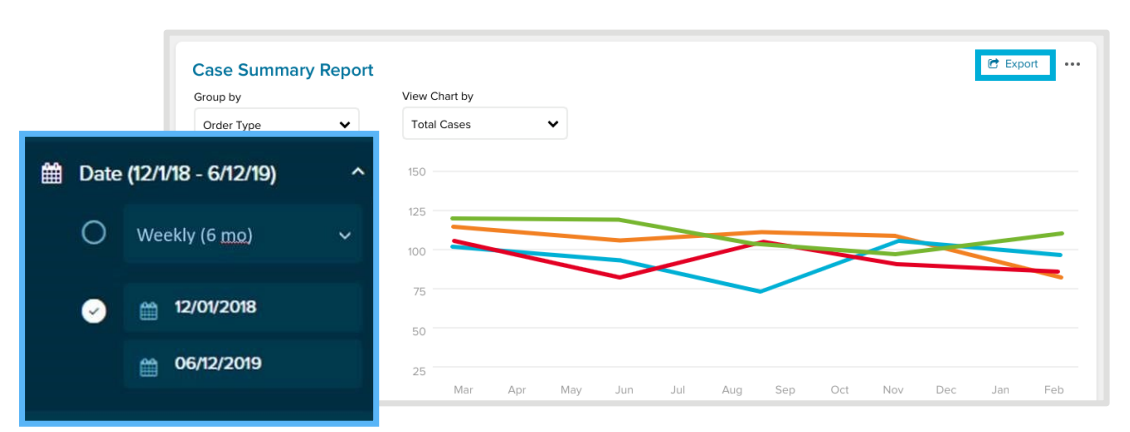
Case Summary Report
- Apply global filters to change date ranges or exclude certain data points
- In addition to grouping your data and selecting specific groupings to view what's important to you, there are also filtering options you can choose from
- Select a custom date range using the date picker; this will display your trend broken out by day
- The trend can display up to 30 days of data
- The data table can display up to 2 years of data
- Hierarchy and Source filters function as usual
- Click "Export" at the top of the page and choose to send yourself Excel data for the trend, the table, or both; you will receive a download link when your report is ready.
|
 |
Related Article
More questions?
If the article didn't answer all of your questions, reach out to SMG Helpline.
Comments
i cannot log into my store4865 sgmemails
Please sign in to leave a comment.